Option between windows Service & Task scheduler?

Here I am talking about two options to set up console application which will run periodically. Here I am considering windows operating system for my scenario. Many time I had to create console application for my project requirement, those console application has to run periodically on hosting (windows) server. I have two option to achieve this scenario ether go for windows service or windows task scheduler.  I was confused about selection and I found best option for me. Here I am sharing difference between two options which will help you too, to choose as per your requirement. Here I am not going to show code difference , we will understand only functional difference.

I have requirement that my application should run once file comes in to given folder and process that file. I don’t know when file will come, but it should process as soon as file comes in to folder. 

What is windows service?

Windows service is same like normal application which will run on windows  server machine. there are some basic difference between windows service application and normal application.

difference:

  • there is no UI for windows service.
  • it run at background.
  • no need to run application manually, it’s configure using services panel on machine.

Windows service run as soon as computer started. If we had set run automatically in services panel else we have to run manually once in machine started. it’s also provide some operating system core features like windows firewall service, send error report to admin and log event happening on machine.

  1. event logging
  2. providing security
  3. error reporting

By using run command services.msc  we can see all services which is running/stop services on open panel (Server/Machine). Here you can run and stop particular service. Its don’t required credential to run windows service.  If we want to run application at all time even without login by the user once machine got start, we will create windows service.

What is Task scheduler?

It’s also same like windows server but the difference is, its open pop up (black console window) whenever scheduler run the task unlike services. it’s also need to configure on server to run after some time period, as per you project requirement. We can set time and days on which scheduler will run the application. while creating scheduler for particular time/day we need to provide credential to run the task. we can set property to rerun task once its got failed. For task scheduler we will get many potions than windows service to configure it.

Now we can look into difference between Windows service and Task scheduler –

Windows service Task scheduler
  •  Run as soon as  computer started.
  • Doesn’t required credential to run
  • Need to configure on service panel.
  • Need to install service using command:-  installutil  .exe from directory where .exe file is present.
  • For uninstall service command:- install \u <projectName>.exe
  • it will not open pop up (UI- black console window) while running application.
  •  Run as on set time by user.
  • Need to provide credential while creating task to run on given time.
  • Need to create task on Task scheduler window.
  • No need to install task like windows service.
  • Task will open pop up whenever exe will execute by task scheduler.
  • it is more convenient if we require to run application once a day or after particular time period unlike windows service.


Here I got the best option for me that I have to create windows service because, I have to run application once some files come in to given folder and process it. Means I do not  need to wait for certain time period, application should run as soon as file has been came in given folder.

now you can decide what option is best for you as per your requirement.


ASP.NET page life cycle and events.

ASP.NET page life cycle and events fire during client-server round trip.

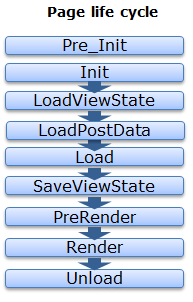
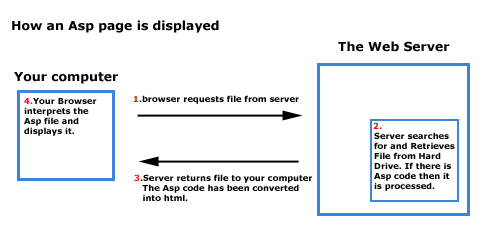
Page life cycle means, process for request coming from client to server for page (resource required to client/browser). when client/browser send request to server for webpage or related resource, http-page handler identify the required page need to be served to client. required page will load into server memory, process it and sent back to client. during this process what happen that is page life cycle. we will understand the same form below figure.

RequestResponse

figure show request coming from client and server will load page into memory and send response back to client.

We will discuss server response code (status code) while Request Response round trip later.

ASP.NET page life cycle have some phase which is given below:

  1. Initialization
  2. Load 
  3. Render
  4. Unload
page-Life-Cycle
Page life cycle events

there are some steps, events and methods are available while page life cycle, using that method you can overridden the same for implement your custom logic. you can add own logic on events as well.Following are the different stages of an ASP.NET page:

  • Page request When browser send page request to server, ASP.NET decides whether to parse and compile the page(new request), or there would be a cached version of the page (cache from client cookie). After decision send the response to client.
  • Starting of page life cycle At this stage, the Request and Response objects are set. If the request is an old request or new one, the IsPostBack (Identify the request whether old or new) property of the page is set to true if request is old else false. The UICulture (global language/ time stamp ) property of the page is also set.
  • Page initialization – At this stage, the controls on the page are assigned unique ID by setting the UniqueID (client ID which is unique prefix with parent control, here content place holder will be parent if master.aspx is used) property and the themes are applied. If the current request is a postback (old request), the postback data has not yet been loaded and control property values have not been restored to the values from view state.
  • Page load At this stage, if the current request is a postback, control properties are loaded with information recovered from view state and control state.
  • Postback event handling  At this stage, If the request is a postback ( old request), control event handlers are called (like gridview bind, selectIndex change etc). after that Validate method called (Page.IsValid property of individual validated controls and of the page).
  • Page rendering At this stage, view state for the page and all controls are saved. The page calls the Render method for each control and the output of rendering is written to the OutputStream class of the Response property of page.
  • Unload The Unload event is raised after the page has been fully rendered. The rendered page is sent to the client and page properties, such as Response and Request, are unloaded and all clean up done.

Here you can remember page life cycle in simple way:-
S:- Start
I:- Initialize
L:- Load
V:- Validate
E:-Event handler (PostBack event handle)
R:- Render Then Unload

Asp.Net page life cycle events where you can write your own logic if required:-

Within each stage of the life cycle of a page, the page raises events that you can handle to run your own code. For control events, you bind the event handler to the event, either declarative using attributes such as onclick, or in code. Pages also support automatic event wire-up. event wire-up means ASP.NET looks for methods with particular names (Page_) and if found then runs those methods when certain events are raised.

ex:- if AutoEventWireup property set true in Page directive. page events are automatically bound to methods that use the naming convention of Page_event, such as Page_Load and Page_Init.

Following are the page life cycle events:

  • Page_PreInit- Occurs after the start stage is complete and before the initialization stage begins. PreInit is the first event in page life cycle. 1.  It checks the IsPostBack property and determines whether the page is a postback. 2. It sets the themes and master pages. 3. Create or re-create dynamic controls. 4. Read or set profile property values.

    If the request is a postback, the values of the controls have not yet been restored from view state. If you set a control property at this stage, its value might be overwritten in the next event.

  • Page_Init- Occurs after all controls have been initialized and any skin settings have been applied. Init event initialize the control property and the control tree is built. Use this event to read or initialize control properties.

    The Init event of individual controls fire before Page_Init event fired. 

  • Page_InitComplete- Occurs at the end of the page’s initialization stage. InitiComplete event allow to tracking ViewState value of controls.  View state tracking enables controls to persist any values that are programmatically adding to the ViewState collection. Until view state tracking is turned on, any values added to view state are lost across postbacks. Controls typically turn on view state tracking immediately after they raise their Init event.

    Use this event to make changes to view state that you want to make sure are persisted after the next postback.

  • Page_PreLoad- PreLoad occurs before the post back data is loaded in the controls. After the page loads view state for itself and all controls
  • Page_Load- The Page object called OnLoad method on Page object and then same OnLoad method will call for child controls (controls on page) until the page and all controls are loaded.

    The OnLoad event occurs for individual controls after page OnLoad event finished. Use OnLoad event method to set properties in controls

  • Control Events ( e.g. DropDown_SelectIndexChanged)- Use these event to handle specific control event such as a Button_Click event, TextBox_Textchange event etc.

    Individual control event occurs after page load event.

  • Page_LoadComplete – Raised at the end of the event-handling stage. The loading process is completed, control event handlers are run, and page validation takes place.
  • Page_PreRender- The PreRender event occurs just before the output is rendered.

    Use the event to make final changes to the contents of the page or its controls before the rendering stage begins.

  • Page_PreRenderComplete- Raised after each data bound control whose DataSourceID need to be set using DataBind() method.
  • Page_UnLoad- It raises the UnLoad event for all controls recursively and lastly for the page itself. Final cleanup is done and all resources and references, such as database connections, are freed.
  • Render:- This is not an event instead at this stage of processing, the Page object calls this method on each control. All ASP.NET Web server controls have a Render method that writes out the control’s markup to send to the browser. If you create a custom control, you typically override this method to output the control’s markup. However, if your custom control incorporates only standard ASP.NET Web server controls and no custom markup, you do not need to override the Render method.

Here I have explained ASP.NET page life cycle steps and events.

Anonymous method in C#

Introduction

In this article I am going to explain what is anonymous method, why we use that and where we use that.

Summary

In versions of C# before 2.0, the only way to declare a delegate was to use named methods. C# 2.0 introduced anonymous methods and in C# 3.0 and later, lambda expressions supersede anonymous methods

most of the people found Delegates, Anonymous methods, and Lambda Expressions very confusing in .NET. I will try to distinguish between these three.

Delegates

In my previous article i have explained that that delegates are used to reference any methods that has the same signature as that of the delegate. In other words, you can call a method that can be referenced by a delegate using that delegate object. reed more..

Anonymous methods

Anonymous methods provide a technique to pass a code block as a delegate parameter. Anonymous methods are basically methods without a name, having method body. You need not specify the return type in an anonymous method; it is inferred from the return statement inside the method body. Anonymous methods enable you to omit the parameter list. This means that an anonymous method can be converted to delegates with a variety of signatures. This is not possible with lambda expressions. For more information specifically about lambda expressions, see Lambda Expressions (C# Programming Guide). This kind of function offers more flexibility than a lambda expression. By using the delegate keyword, you can add multiple statements inside your anonymous function. It can use if-statements and loops. An anonymous method behaves like a regular method and allows us to write inline code in place of explicitly named methods.


Key points

  • A variable, declared inside the anonymous method can’t be accessed outside the anonymous method.
  • No unsafe code can be accessed within the anonymous-method-block.
  • Anonymous methods are not allowed on the left side of the is operator.
  • We use anonymous method in event handling.
  • An anonymous method, declared without parenthesis can be assigned to a delegate with any signature.
  • Unsafe code can’t be accessed within an anonymous method.
  • An anonymous method can’t access the ref or out parameters of an outer scope.
  • An anonymous method cannot access the ref or out parameters of an outer scope.

Syntax


// Create a delegate.
delegate int process_delegate(int num1, int num2);

// Instantiate the delegate using an anonymous method.
MyDel md = delegate(int num1, int num2) { /* do something */ };

The scope of the parameters of an anonymous method is the anonymous-method-block.

Example:

using System;

delegate void process_delegate(int num1, int num2);
namespace C#DelegatesDemo
{
    class delegate_program
    {
        static int num = 0 ;
        public static void AddNum(int p, int q)
        {
            num = p + q;
            Console.WriteLine("AddNum value: {0}", num);
        }

        public static void MultNum(int p, int q)
        {
            num = p * q;
            Console.WriteLine("MultNum value: {0}", num);
        }

        static void Main(string[] args)
        {
            //create delegate instances using anonymous method
           process_delegate pd = delegate(int x, int y)
            {
               Console.WriteLine("Anonymous Method: {0}{1}", x,y);
            };

            //calling the delegate using the anonymous method
            pd(20,10);

            //instantiating the delegate using the named methods
            pd =  new process_delegate(AddNum);

            //calling the delegate using the named methods
            pd(10,30);

            //instantiating the delegate using another named methods
            pd =  new process_delegate(MultNum);

            //calling the delegate using the named methods
            pd(5,10);
            Console.Read();
        }
    }
}

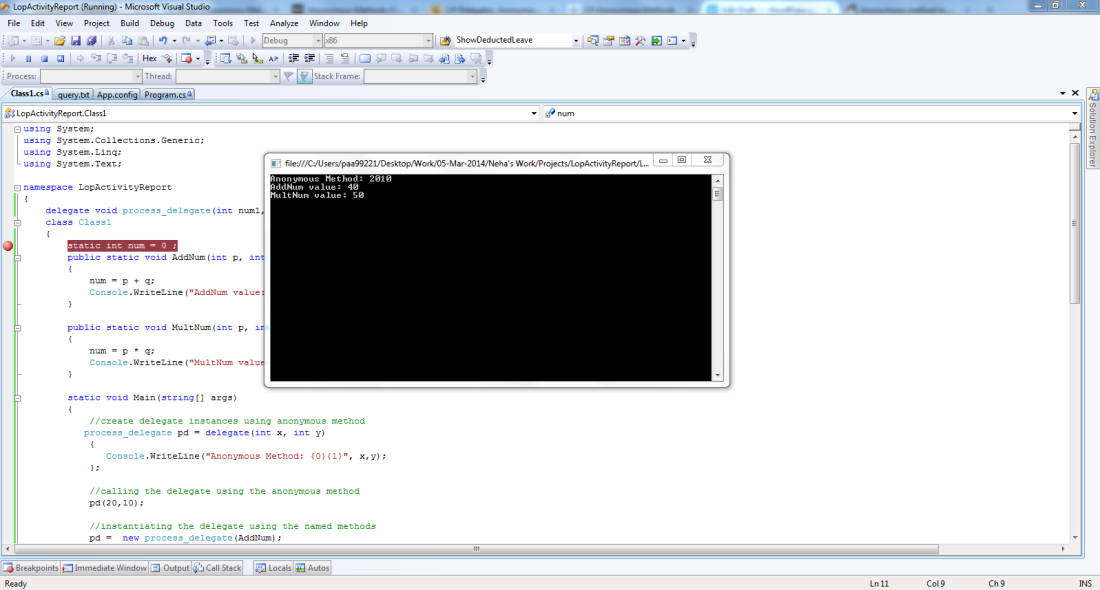
When the above code is compiled and executed, it produces the following result:
O/P:-

Anonymous Method:2010
AddNum value:40
MultNum value:50

out put

Anonymous Method as an Event Handler

You can use anonymous method on event handler. take simple example for button click event.

example:-

	// Click Event handler using Anonymous method
	 btnSubmit.Click+=delegate {
                                     MessageBox.Show("you clicked me");
                                    };

It will show the alert message when btnSubmit click event will occur.

Interface and Abstract class in C# (OOP’s)

Introduction

In this article along with the demo Code I will discuss Interfaces versus Abstract classes. The concept of Abstract classes and Interfaces is a bit confusing for beginners of Object Oriented programming. Therefore, I am trying to discuss the theoretical aspects of both the concepts and compare their usage. And finally I will demonstrate how to use them with C#.

About Abstract Class :

Abstract class is a class that contain complete(complete/Body) and abstract (Incomplete/Definition) both type of member and it can not be instantiated, Abstract classes are one of the essential behaviors provided by dotnet.
So the question is why we need a class that cannot be instantiated? An abstract class is only to be sub-classed (inherited from). In other words, it only allows other classes to inherit from it but cannot be instantiated.

When we create an abstract class, we are creating a base class that might have one or more completed methods but at least one or more methods are left uncompleted and declared abstract. If all the methods of an abstract class are uncompleted then it is same as an interface. The purpose of an abstract class is to provide a base class definition for how a set of derived classes will work and then allow the programmers to fill the implementation in the derived classes.

Key Points:

  • Abstract class can have property, Data fields ,Methods (complete / incomplete) both.
  • If method or Properties define in abstract keyword that must override in derived class.(its work as a tightly coupled functionality)
  • If define abstract keyword for method or properties in abstract class you can not define body of method and get/set value for properties and that must override in derived class.
  • Abstract class does not support multiple inheritance.
  • Abstract class contains Constructors.
  • An abstract class can contain access modifiers for the subs, functions, properties.
  • Only Complete Member of abstract class can be Static.

Advantage:

  1. It is a kind of contract that forces all the subclasses to carry on the same hierarchies or standards.
  2.  If various implementations are of the same kind and use common behavior or status then abstract class is better to use.
  3. If we add a new method to an abstract class then we have the option of providing default implementation and therefore all the existing code might work properly.
  4. Its allow fast execution than interface.(interface Requires more time to find the actual method in the corresponding classes.)
  5. It can use for tight and loosely coupling.

About Interface :

An interface is not a class. It is an entity that is defined by the word Interface. Interface is a type which contains only the signatures of methods, delegates or events, it has no implementation, Implementation of the methods is done by the class that which implements the interface. In other words, just the definition of the methods without the body.

As one of the similarities to Abstract class, it is a contract that is used to define hierarchies for all subclasses or it defines specific set of methods and their arguments. The main difference between them is that a class can implement more than one interface but can only inherit from one abstract class. Since C# doesn’t support multiple inheritance, interfaces are used to implement multiple inheritance.
Interface is a contract that defines the signature of the functionality. So if a class is implementing a interface it says to the outer world, that it provides specific behavior. Example if a class is implementing ‘Idisposable’ interface that means it has a functionality to release unmanaged resources.

Key Points:

  • Interface can have property, Methods (incomplete/signature only) but not  Data fields.
  • If method or Properties define in Interface that must used in implemented class.(its work as a tightly coupled functionality) no need to use New,override keyword for access data member from interface.
  • Interface can not define body of method and get/set value for properties and that must used in implemented class.
  • Interface does provide facility for multiple inheritance.
  • Interface can not contains Constructors.
  • Interface  can not access modifiers for the  functions, properties its by default public only.
  • Member of interface can not be Static.

Advantage:

  1. If various implementations only share method signatures then it is better to use Interfaces.
  2. Interfaces are used to define the peripheral abilities of a class. In other words both Human and Vehicle can inherit from a IMovable interface.

Demo Code:

MyCar Abstract class:-

using System;

namespace AbstractInterfaceExample
{
    public abstract class MyCar
    {
        //Abstract class not define fields.
        protected string _colour;
        protected string _brand;
        protected string _launchingYear;
        protected double _prise;

        //define Properties as abstract
        public abstract string Colour
        {
            get;
            set;
        }
        public abstract string Brand
        {
            get;
            set;
        }
        public abstract string LaunchingYear
        {
            get;
            set;
        }
        public abstract double Prise
        {
            get;
            set;
        }

        //methods with defination
        public String GetColour(string carNameName)
        {
            switch (carNameName.ToLower().Trim())
            {
                case "alto":
                    Colour = "Red";
                    break;
                case "city":
                    Colour = "Black";
                    break;
                default:
                    Colour = "Colour no found";
                    break;
            }
            return Colour;
        }
        public String GetBrand(string carNameName)
        {
            switch (carNameName.ToLower().Trim())
            {
                case "alto":
                    Brand = "MarutiSuzuki";
                    break;
                case "city":
                    Brand = "Honda";
                    break;
                default:
                    Brand = "Does not found brand.";
                    break;
            }
            return Brand;
        }
        public String GetLaunchingYear(string carNameName, string brandName)
        {
            if (carNameName.ToLower().Trim() == "alto" && brandName.ToLower().Trim() == "marutisuzuki") 
            { LaunchingYear = "1st Jan 2000"; }
            else if (carNameName.ToLower().Trim() == "city" && brandName.ToLower().Trim() == "honda") 
            { LaunchingYear = "18st Oct 2005"; }
            else 
            { LaunchingYear = "Does not found Launching Year."; }
            return LaunchingYear;
        }

        //Error:'AbstractInterfaceExample.MyCar.GetPrise()' must declare a body because it is not marked abstract, extern, or partial	
        //C:\Users\paa99221\Desktop\Pradeep\example\AbstractInterfaceExample\AbstractInterfaceExample\MyCar.cs	81	23	AbstractInterfaceExample
        //public double GetPrise(string carNameName, string brandName);

        //abstract method that allow to define without body of the class.
        public abstract double GetPrise(string carNameName, string brandName);

    }
}

IMyCar Interface:-

using System;
/*******************************************************
 * Interface for MyCar
 * *****************************************************/
namespace AbstractInterfaceExample
{
    interface IMyCar
    {
       
        //just signature of the properties.
        //Interface can not define fields.
        string Colour{ get; set; }
        string Brand { get; set; }
        string LaunchingYear { get; set; }
        double Prise { get; set; }

        //cannot have defination of method only define signature of method. 
        // cannot have access specifier by default public. 
        // cannot have virtual key word for override the method.
        String GetColour(string carNameName);
        String GetBrand(string carNameName);
        String GetLaunchingYear(string carNameName,string brandName);

        //Error	1	'AbstractInterfaceExample.IMyCar.GetPrise(string, string)': interface members cannot have a definition	
        //C:\Users\paa99221\Desktop\Pradeep\example\AbstractInterfaceExample\AbstractInterfaceExample\IMyCar.cs	21	16	AbstractInterfaceExample
        //double GetPrise(string carNameName, string brandName) { }

        double GetPrise(string carNameName, string brandName);

    }
}

DemoAbstractExample class inherit abstract class:-

derived Class inherit from base  abstract MyCar.

//Inherit abstract class MyCar
    public class DemoAbstractExample:MyCar
    {
        
        //uses all the properties of the Abstract class therefore no 
        //properties or fields here.
        //Override Properties using override keyword
        public override string Colour
        {
            get { return _colour; }
            set { _colour = value; }
        }
        public override string Brand
        {
            get { return _brand; }
            set { _brand = value; }
        }
        public override string LaunchingYear
        {
            get { return _launchingYear; }
            set { _launchingYear = value; }
        }
        public override double Prise
        {
            get { return _prise; }
            set { _prise = value; }
        }

        //common methods that are implemented in the abstract class
        //use new keyword for override the method which is not defined 
        //'abstract' or 'virtual' keyword in base class (MyCar class)
        public new String GetColour(string carNameName)
        {
            return base.GetColour(carNameName);
        }
        public new String GetBrand(string carNameName)
        {
            return base.GetBrand(carNameName);
        }
        public new String GetLaunchingYear(string carNameName, string brandName)
        {
            return base.GetLaunchingYear(carNameName, brandName);
        }

        //use override keyword for override the method which is defined 
        //'abstract' keyword in base class (MyCar class)
        public override double GetPrise(string carNameName, string brandName)
        {
            if (carNameName.ToLower().Trim() == "alto" && brandName.ToLower().Trim() == "marutisuzuki")
            { Prise = 350000.00; }
            else if (carNameName.ToLower().Trim() == "city" && brandName.ToLower().Trim() == "honda")
            { Prise = 1050000.00; }
            else
            { Prise = 0.00; }
            return Prise;
        }
    }

DemoInterfaceExample class impliment interface:-

Class implements interface IMyCar.

//impliment interface IMyCar
    public class DemoInterfaceExample:IMyCar 
    {
        //fields are defined here.
        protected string _colour;
        protected string _brand;
        protected string _launchingYear;
        protected double _prise;

        //set Properties values
        public string Colour //Property name present in Interface
        {
            get { return _colour; }
            set { _colour = value; }
        }
        public string Brand
        {
            get { return _brand; }
            set { _brand = value; }
        }
        public string LaunchingYear
        {
            get { return _launchingYear; }
            set { _launchingYear = value; }
        }
        public double Prise
        {
            get { return _prise; }
            set { _prise = value; }
        }

        //implementation the Interface entity (methods).
        public string GetColour(string carNameName)
        {
            switch (carNameName.ToLower().Trim())
            {
                case "alto":
                    Colour = "Red";
                    break;
                case "city":
                    Colour = "Black";
                    break;
                default:
                    Colour = "Colour not found.";
                    break;
            }
            return Colour;
        }
        public String GetBrand(string carNameName)
        {
            switch (carNameName.ToLower().Trim())
            {
                case "alto":
                    Brand = "MarutiSuzuki";
                    break;
                case "city":
                    Brand = "Honda";
                    break;
                default:
                    Brand = "Does not found brand.";
                    break;
            }
            return Brand;
        }
        public String GetLaunchingYear(string carNameName, string brandName)
        {
            if (carNameName.ToLower().Trim() == "alto" && brandName.ToLower().Trim() == "marutisuzuki")
            { LaunchingYear = "1st Jan 2000"; }
            else if (carNameName.ToLower().Trim() == "city" && brandName.ToLower().Trim() == "honda")
            { LaunchingYear = "18st Oct 2005"; }
            else
            { LaunchingYear = "Does not found Launching Year."; }
            return LaunchingYear;
        }
        public double GetPrise(string carNameName, string brandName)
        {
            if (carNameName.ToLower().Trim() == "alto" && brandName.ToLower().Trim() == "marutisuzuki")
            { Prise = 350000.00; }
            else if (carNameName.ToLower().Trim() == "city" && brandName.ToLower().Trim() == "honda")
            { Prise = 1050000.00; }
            else
            { Prise = 0.00; }
            return Prise;
        }

    }

Main class:-

main class.

class Program
    {
        //main method 
        static void Main(string[] args)
        {
            DemoAbstractExample DAE = new DemoAbstractExample();
            DemoInterfaceExample DIE = new DemoInterfaceExample();
            Console.WriteLine("press 1 for Absract class and 2 for interface.");
            int choice = Convert.ToInt16(Console.ReadLine());
            if (choice == 1)
            {
                Console.WriteLine("I am from Abstract Class..");
                Console.WriteLine("Enter Car name for get colour..");
                Console.WriteLine("Car colour is: {0}", DAE.GetColour(Console.ReadLine().ToString()));
                Console.WriteLine("Enter Car name for get Manufacturer..");
                Console.WriteLine("Car belongs to: {0}", DAE.GetBrand(Console.ReadLine().ToString()));
                Console.WriteLine("Enter Car name and Brand for get Launching Year..");
                Console.WriteLine("Car has been Launched in: {0}", DAE.GetPrise(Console.ReadLine().ToString(), Console.ReadLine().ToString()));
                Console.WriteLine("Enter Car name and Brand for get prise of the car..");
                Console.WriteLine("Prise of car is: {0}", DAE.GetPrise(Console.ReadLine().ToString(), Console.ReadLine().ToString()));
            }
            else
            {
                Console.WriteLine("I am from Interface..");
                Console.WriteLine("Enter Car name for get colour..");
                Console.WriteLine("Car colour is: {0}", DAE.GetColour(Console.ReadLine().ToString()));
                Console.WriteLine("Enter Car name for get Manufacturer..");
                Console.WriteLine("Car belongs to: {0}", DAE.GetBrand(Console.ReadLine().ToString()));
                Console.WriteLine("Enter Car name and Brand for get Launching Year..");
                Console.WriteLine("Car has been Launched in: {0}", DAE.GetPrise(Console.ReadLine().ToString(), Console.ReadLine().ToString()));
                Console.WriteLine("Enter Car name and Brand for get prise of the car..");
                Console.WriteLine("Prise of car is: {0}", DAE.GetPrise(Console.ReadLine().ToString(), Console.ReadLine().ToString()));
            }
            //retain the scree.
            Console.ReadLine();
        }

In the above examples, I have explained the differences between an abstract class and an interface. I have also implemented a demo project which uses both abstract class and interface and shows the differences in their implementation.

Windows Authentication for ASP.NET application on IIS 8

As I have post before how to host asp.net application on IIS 8, you can find here link Click Here. Now I am going to explain how to set Windows Authentication for asp.net application. To make Windows authorize application you need to make changes in web.config as well as IIS manager also.

Before going ahead, Just brief introduction about authentication in asp.net.

There are three type of authentication available in asp.net.

  1.  Form authentication :- user can authorize using log in ID and password through custom page. (usually we use Login.aspx)
<system.web>
   <authentication mode="Form">
     <forms loginUrl="Login.aspx"/>
   <authentication/>
<system.web>

you will get more information here click here.

  1. Passport Authentication:- The Passport authentication provider uses the PassportAuthenticationModule module to provide a wrapper around the .NET Passport service for ASP.NET applications.
 <authentication mode= "Passport"/>

you will get more information here click here.

  1. Windows Authentication:- Windows authentication come in mind when user is in windows domain. Means windows authentication do user authorize using windows userID and password. When ever user log in the system using user name for that machine, same user name use for authenticate the user to access asp.net application. you will get more information here.

Configuring Windows Authentication:-

 <system.web>
    <authentication mode="Windows"/>
 </system.web>
  1. Start Internet Information Services (IIS).
  2. Right-click your application’s virtual directory, and then click Properties.
  3. Click the Directory Security tab.
  4. Under Anonymous access and authentication control, click Edit.
  5. Make sure the Anonymous access check box is not selected and that Integrated Windows authentication is the only selected check box.

* If you will put Anonymous check box checked then it will not take windows login Id for the user.

e.g. string windowsLogin = Page.User.Identity.Name;

Authentication

Almost you have done here. now your application will work on windows authentication.

Example code:-

protected void Page_Load(object sender, EventArgs e)
{
   try
     {
       //Start:
        if (Session["EmployeeCode"] == null)
          {
             string windowsLogin = Page.User.Identity.Name;
             //Check user is valid or not from data base
            //I am putting simple condition by hard code value
            if (windowsLogin=='ValidUser')
                 {
                   Session["EmployeeCode"] = userId;
                 }
             else
                {
                  Session.Abandon();
                  Response.Redirect("InvalidUser.aspx", false);
                }
         //End
     }
    catch (Exception ex)
    {
       //Handel exception here
       Throw;
     }
}

# Now its done, You will get user from windows credential and check with existing user with database. If user is valid go ahead other wise navigate the user to Invalid page.

Impersonation with Windows Authentication

By using impersonation, ASP.NET applications can execute code or access resources with the identity of the authenticated user ( Default user ). Standard impersonate-level impersonation tokens that are usually created when you enable impersonation allow you to access local resources only. To be able to access remote network resources, you require a delegate-level token. To generate a delegate-level token when you impersonate, you need to use Kerberos authentication and your process account needs to be marked as trusted for delegation in Active Directory.

The <identity> element is configured as follows. Note that impersonation is disabled.

    <identity impersonate="false" userName="" password="" />

Impersonating a Fixed Identity with Windows Authentication

You can configure ASP.NET to impersonate a fixed identity. You specify the credentials of the impersonated identity on the <identity> element in the Web.config file as shown here.

    <system.web>
       <authentication mode="Windows"/>
           <identity impersonate="true" userName="UserName" password="password"/>
    </system.web>

To create default user in IIS :-

    1. Open IIS Manager and navigate to the level you want to manage. For information about opening IIS Manager, see Open IIS Manager (IIS 7). For information about navigating to locations in the UI, see Navigation in IIS Manager (IIS 7).
  • In Features View, double-click Authentication.
  • On the Authentication page, select ASP.NET Impersonation.
  • In the Actions pane, click Enable to use ASP.NET Impersonation authentication with the default settings.
  • Optionally, in the Actions pane, click Edit to set the security principal.
  • In the Edit ASP.NET Impersonation Settings dialog box, select either Specific user or Authenticated user. Whichever you decide, IIS uses this identity for the security context of the ASP.NET application. By default, IIS 7 is set to impersonate the authenticated user.
  • Click OK to finish or proceed to the next optional steps to change the identity to impersonate.
  • Optionally, click Set to change the Specific user identity.
  • In the Set Credentials dialog box, enter the name of an existing user account in User name, the password associated with that user account in Password, and then the exact same value in Confirm password for a new account IIS should use for anonymous access.
  • Click OK to close the Set Credentials dialog box.
  • Click OK to close the Edit ASP.NET Impersonation Settings dialog box.

Advance setting
Advance setting
Application pool
Application pool
set user
Set Credentials dialog box

Is done. Now you have set default user to access local resources.